Toon Flare
Free, stylized lens flares for After Effects. Make a new flare with one click. Click again to randomize.
Free product downloads
To download freebies you need to join our mailing list:
If you already joined, check your email. You'll need to enable cookies and open the access link in this browser.
Installation
Toon Flare is installed the same way as most scripts. Instructions are here,
Usage
Run the script and it will generate a random Toon Flare and null controller layer. Move the controller layer around to see how it looks in motion. Keep the controller layer selected, run the script again, and it will replace the existing one with a new random flare. Keep clicking, until you get one you like.
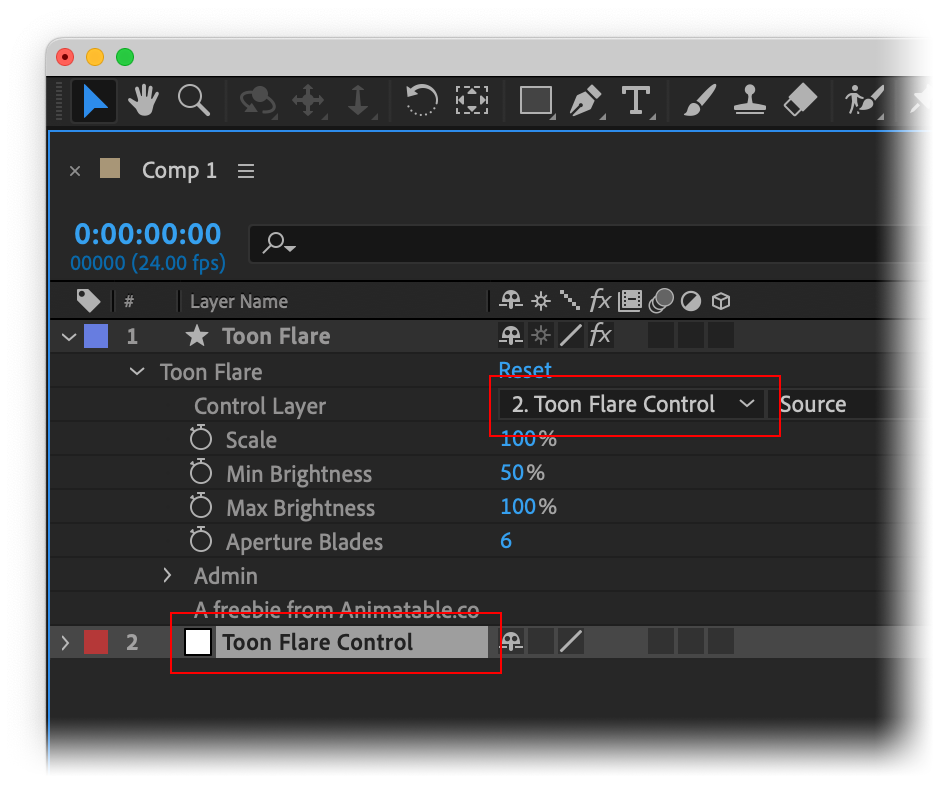
The flare layer has an effect on it called Toon Flare, with the following controls:
Control Layer
You can select a layer in the dropdown to tell the flare to use a different layer as it's origin point.
Scale
Each flare layer contains several elements. The Scale control will scale every individual element up or down.
Brightness
The Brightness settings affect the Opacity of each element as it moves towards or away from the center of the comp. Max Brightness is reached at the center of the comp, and Min Brightness is reached at 1.5x the distance from the centre of the comp to it's corners. Brightness settings modify the underlying value of each element's opacity. So with the default settings of Min 50% and Max 100%, an element with an Opacity of 60, will be 60 when at comp center, and 30 (50% of 60) when outside the comp edges.
Aperture Blades
The number of sides that Iris elements have.
Elements
You can customize the elements within a flare by delving in to the shape layer contents. Each element is contained in a single Shape Group with a name like Soft Glow or Flat Iris 1 . You can move them along the flare's axis with the Offset > Amount inside each element group.
How can I turn off distracting wireframes?
When you select the Toon Flare layer, you'll probably see a lot of shape outlines in the comp. You can turn these off and on again by hitting Cmd / Ctrl + Shift + H or clicking on View > Show Layer Controls.
Offset
The Offset property's Amount is used to determine where the element lies along the flare axis. A value of 100 will place the element precisely over the origin - where the control layer is. A value of -100 will place the element precisely opposite that point, on the other side of the comp.
The Offset is actually a dummy Pucker & Bloat property, so if you turn on it's visibility eyeball, it will Pucker or Bloat the element. So don't do that.
Scale
Each element group has an expression on it's Transform > Scale property so that it gets bigger or smaller with the main Scale control described above, but you can still alter the underlying value yourself. This is the best way to make elements bigger or smaller.
Colors
Most elements have their Opacity (Brightness) automatically modified by expressions on the Fill or Gradient Fill > Opacity property. The underlying value can still be changed to make the element brighter or dimmer.
You can change the Fill or Gradient Fill colors. Most colors are randomly assigned within a warm range of hues. If you want to shift all the colors in the flare together, see below.
Customizing further
Try changing the blending mode of the flare layer. Add, Screen, Soft Light and Hard Light can all look good.
To change all the colors of a Toon Flare at once, try using an effect on the layer:
Hue/Saturation - Change the Master Hue property to quickly shift the warm hue to a cooler one.
Curves - For full creative control over colors.
Colorama - Go crazy with extreme stylized colors. You should probably twirl down the Modify group and uncheck Modify Alpha.
Toon Flare works great with a lot of other native effects. Try using Optics Compensation or Spherize for a distorted, bulging look. CC Radial Fast Blur or Compound Blur can work well to blur some elements more than others. Glow and even Minimax can get some unusual bloom / glowing results.
How can I make it look more real?
Toon Flare looks significantly more realistic if you set your project to 32bpc (go to File > Project Settings > Color > Depth). But do be aware that this setting can also change the way other things in your project look when composited.
Randomizing
When you randomize a flare, it actually just makes a totally new layer and deletes the old one. Your settings for Control Layer, Scale, Brightness and Aperture Blades will be preserved, but any effects or other changes you've made to the flare layer will be lost.
If you hold the Option key when clicking the panel button, or pass the argument basic to KBar, the flare will be a consistent, basic flare with one of every possible element. You can use this as a base to consciously design your own flare by duplicating and modifying the elements in the shape layer.
Randomizing requirements
To randomize a flare, the Control Layer dropdown in the Toon Flare effect must be assigned to a layer, and you must have this assigned layer selected in the timeline.
Version History
1.0.1 - December 14th 2022
Updated compatibility with After Effects 2020+
1.0 - December 12th 2022
Initial release